This is another one of those recipes that’s not really a recipe – it’s so easy! It only has three ingredients and takes 15 minutes to make. If you have kids — or anyone in your family — that loves jam, you HAVE to try chia jam! It’s a yummy, healthier alternative. Don’t get me wrong, jelly and jam still have a place on our house, but this is a great addition to our rotation. Try it today!
recipe

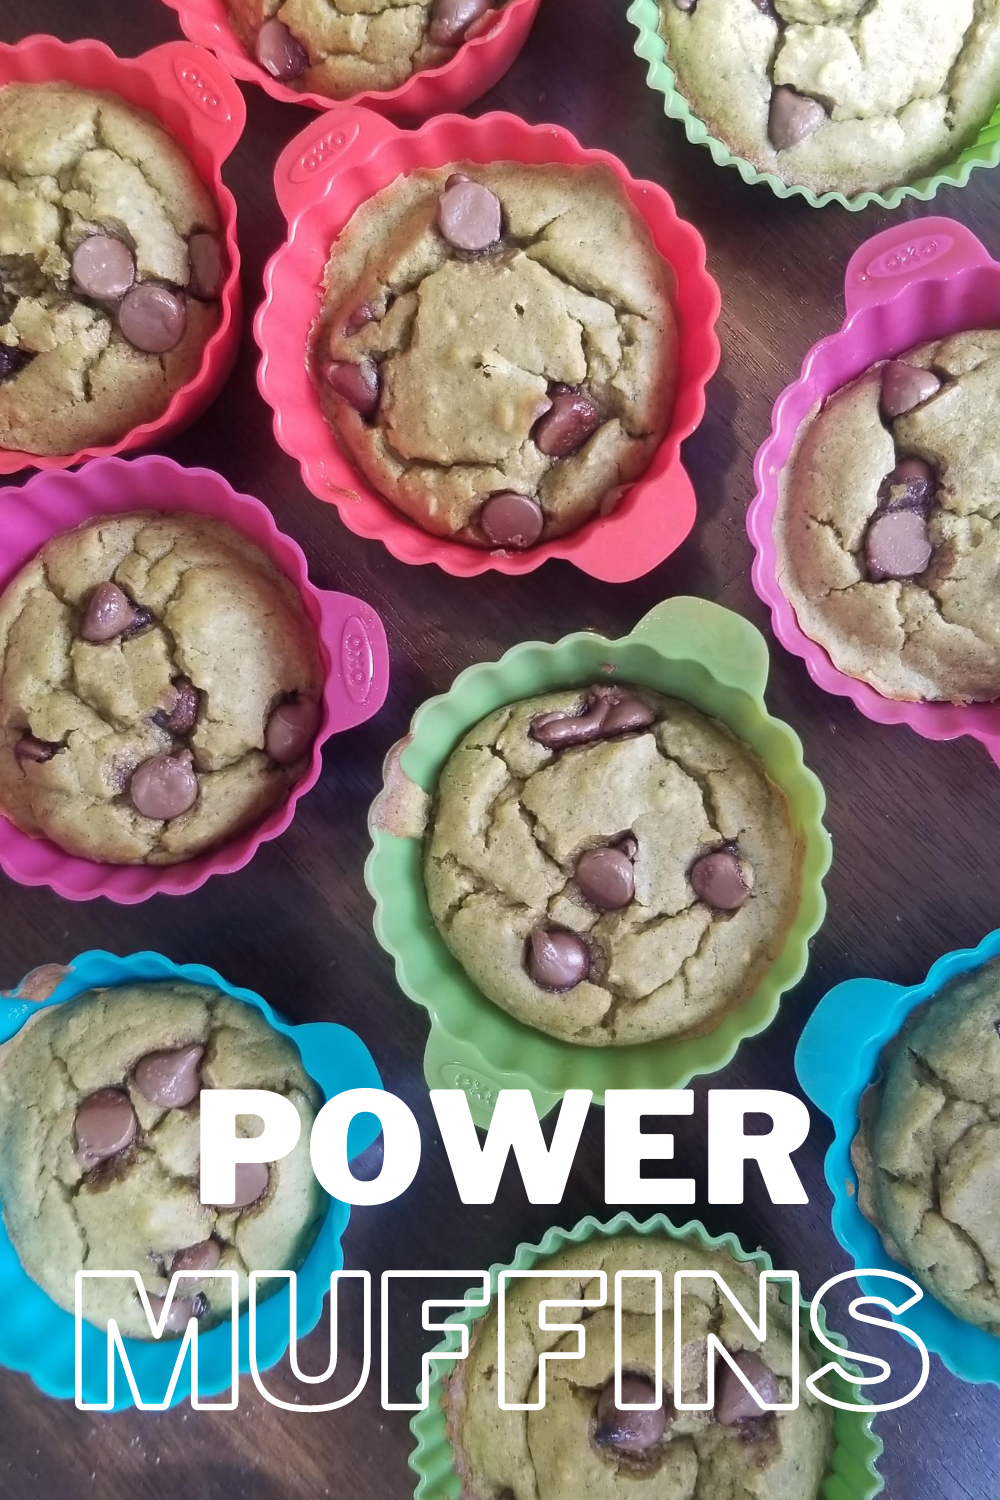
POWER Muffins (a.k.a. Sweet Potato, White Bean, Spinach + Banana Muffins)
Those of you who aren’t new around here know that my kids love muffins. In fact, when my oldest was a toddler, we called him the Muffin Man, because he ate so many of them. So since then, I’m always looking for a good muffin recipe that is healthy, easy to make, and kid approved. And now that he’s in school and taking nut-free snacks, I am making more muffins that are nut free so he can bring them in.
These muffins have protein, fiber and vegetables. Oh, and chocolate! What’s not to like? That’s why we call them POWER muffins!
POWER Muffins
Here’s what you need:
- 1 cup sweet potato, cooked and mashed
- 1/2 banana (about 1/3 cup mashed)
- 1/3 cup fresh spinach
- 1 can great northern beans, rinsed and drained
- 1/3 cup avocado oil
- 1/3 cup maple syrup
- 2 eggs
- 1 teaspoon cinnamon
- 1/3 cup oats
- 1/4 cup flaxseed
- 1/2 cup flour (I’ve used white whole wheat and all purpose)
- 1 teaspoon baking soda
- 1/3 cup chocolate chips
Here’s what you do:
- Preheat the oven to 375 degrees Fahrenheit. Prepare your muffin tin – I use silicone reusable baking cups and spray them with non-stick cooking spray.
- In a food processor, combine sweet potato, banana, spinach, beans, eggs, oil and syrup.
- Add cinnamon, oats and flaxseed and mix well.
- Add in flour and baking soda and pulse a few times until combined.
- Divide the batter evenly between 12 muffin cups. Sprinkle chocolate chips on top.
- Bake muffins for 20 to 25 minutes, or until a toothpick inserted into the muffin comes out clean.
- Cool muffins and then enjoy! I like to keep 6 out and then freeze 6 so I have individual muffins ready to go whenever. I simply take one out of the freezer and defrost overnight OR in the microwave.

Seeking a non-healthy muffin? Give these a try instead!
Some questions for you:
- What do you do with spinach? We just bought a big tub of it at Costco!
- What’s a healthy-ish recipe you made recently?
Share this:

Healthyish Banana Zucchini Muffins
My kids love muffins. They always have. And who could blame them? Tiny pieces of cake in a muffin-like single-serving shape? What’s not to like?

These muffins are sweet enough that my kids call them “treat muffins” (they’re sweeter than my spinach/zucchini/carrot muffins), but healthy enough to be called “healthyish.” They use honey instead of refined sugar, and white whole wheat flour. I also add in half a zucchini for some moisture and added veggies – but these truly taste like just your every day banana muffins! They’re easy to make if you have about 2 bananas on hand, so much that I’ve asked my family to set aside 2 bananas and NOT eat them, just so we can make these.

Healthyish Banana Zucchini Muffins
Here’s what you need:
- ½ cup honey
- ⅓ cup avocado oil
- 2 eggs
- 2 large bananas, mashed (mine came out to be a little over 1 cup in volume)
- 1/2 zucchini, grated – pat with a paper towel to remove excess moisture (Note – I have made these without zucchini and haven’t had to change anything up, they’re still good just no added veggie)
- ¼ cup almond milk (this is my favorite almond milk; you can use regular milk if you like)
- 1 teaspoon vanilla extract
- 1 teaspoon cinnamon (my kids love cinnamon, but if you’re not a big fan you can omit this or add in less)
- 1 ¾ cups white whole wheat flour
- 1 teaspoon baking soda
- ¼ teaspoon salt
- blueberries, optional
Here’s what you do:
- Preheat the oven to 325 degrees Fahrenheit. Prepare your muffin tin – I use silicone reusable baking cups and spray them with non-stick cooking spray.
- In a large bowl, mix honey, avocado oil and eggs.
- Add in the mashed bananas, grated zucchini, milk and vanilla extract. Mix well.
- On the side, combine the dry ingredients — the cinnamon, flour, salt, baking soda. Add into the wet mixture and mix until just combined. DO NOT overmix!
- Optional — add in blueberries or other add-ins. Suggestions include dried cherries or chocolate chips 🙂 I added in blueberries to a few of the muffins but not all. If you want to have blueberry (or another add-in) throughout, add in about 3/4-1 cup.
- Divide the batter evenly between 12 muffin cups. Bake muffins for 20 to 25 minutes, or until a toothpick inserted into the muffin comes out clean. Mine took about 24 minutes.
- Cool muffins and then enjoy! I like to keep 6 out and then freeze 6 so I have individual muffins ready to go whenever. I simply take one out of the freezer and defrost overnight OR in the microwave.

Nutrition info (I borrowed this from MyFitnessPal – I am not a dietician, just someone who likes to bake and make treats sometimes a little healthier, and I can’t claim 100% accuracy)

Seeking a non-healthy banana muffin? Give these a try instead!
Some questions for you:
- Do you have a go-to muffin recipe?
- What’s a healthy-ish recipe you made recently?
Share this:

Meatless Monday: Curried Lentil Soup featuring Gardein Beefless Ground
I recently was given a chance to try out some of Gardein’s meatless specialties, and once again, I love them. Even FW is a fan – he loves their 7 Grain Tenders. All their foods are easy to make and I love the variety of products they have. Plus, it’s vegan and kosher AND some are also gluten free!
With my care package, I was challenged to put together a recipe using Gardein goodies, featuring some Spring/Summer produce items.
Spring and summer in Northeast Ohio bring abundant carrots, zucchini, herbs, etc. All of which are perfect to go in a soup! This easy crock pot soup is perfect for those rainy spring days where all you want is something comforting. Pair with some warm, crusty bread, and you’ve got the ultimate comfort food!

Curried Lentil Soup (featuring Gardein Beefless Ground)
Here’s what you need:
- 1 large sweet potato, cubed (about 2 cups)
- 1 large russet potato, cubed (about 2 cups)
- 1 cup carrots, peeled and chopped
- 1 cup celery, chopped
- 1 zucchini, chopped
- 2 cup green lentils
- 1 onion, chopped
- 4 cloves garlic, chopped
- 10 cups vegetable broth
- 1/2 teaspoons tarragon
- 1 teaspoon thyme
- 1/2 teaspoon rosemary
- 1 Tablespoon curry powder
- 2 cups Gardein beefless ground
- shaved Parmesan, optional
Here’s what you do:
- Add all ingredients, minus the Gardein beefless ground to the crockpot. Cook on low for 8 hours.
- After cooked, remove about 3 cups of the soup and add to your blender. Blend it until it’s smooth and creamy. Add back to the slow cooker.
- Add in the 2 cups Gardein beefless ground. Stir well and cook on low for another 30 minutes.
- Top with shaved Parmesan if desired and serve with fresh bread.

Bonus: while my toddler didn’t quite like it (he’s a picky eater), my 10-month-old daughter love it! LM couldn’t get enough!

Nutrition info calculated via MyFitnessPal – I take no credit or blame if it’s incorrect:)

Disclosure: I was given samples of Gardein’s meatless entrees to try out. All reviews and views are my own.
Linking up with Meatless Monday.

Share this:

Summery Grilled Chicken, Avocado, Goat Cheese and Cherry Salad
Now that I’m no longer pregnant and I’m nursing, I’m trying to make a conscious effort to eat healthy again. What does this mean for me? It doesn’t mean cutting out sweets (sorry LM, but I have a sweet tooth!), but instead, it’s about balance. Which means finding ways to get my veggies in.
When I was pregnant, I was turned off by salads and a lot of veggies for some reason. But now that I’m not, I am happy to eat them again! There are only 2 things getting in my way:
- I’m turned off by boring food – if I’m going to have a salad, I want it to be FUN!
- I don’t have much free time lately. My hands are full literally most of the day (see: nursing a newborn) and then at night when I’m juggling 2 kids, one of whom is a needy and hungry toddler, I don’t feel like spending too much time preparing a meal.
That’s where this salad comes in. It’s anything BUT boring – look at it! It’s colorful! Doesn’t it just shout, “summer”?

AND it can be prepped in advance. I was able to prep all the ingredients throughout the day and then it only took 2 minutes to pull it together at dinner time. Plus, Half of the ingredients were things that I could put on FW’s plate, too, so we all could enjoy a similar dinner, which doesn’t happen often!

See FW’s food vs ours
I can barely call this a recipe because it’s just throwing a few foods together, but in case this inspires you – here it is.

Summery Grilled Chicken, Avocado, Goat Cheese and Cherry Salad
For us, this served 2
Here’s what you need:
- 1/2 cup chopped grilled chicken – I got lucky and B had grilled the night before so we had leftover grilled chicken
- 1/2 cup crumbled goat cheese
- 1/2 avocado, chopped
- 4-6 cherries, pitted and sliced in half – I used Skylar Rae cherries* because of their sweetness, firm texture and beautiful color
- 3 cups lettuce
- 1/2 cup other veggies of your choosing – I did roasted sweet potatoes and sliced carrots
- 1/2 cup other protein of your choosing – I did chickpeas, hard-boiled egg and ham
- Your favorite dressing – mine is an easy balsamic dressing with mustard (similar recipe, here)
Here’s what you do:
- Prepare your ingredients. Measure out your chicken, goat cheese, avocado and cherries. The Skylar Rae cherries are perfect for this salad because of their sweetness and nice crisp texture.
- Place on top of lettuce.
- Gather other ingredients of your choice – I also added roasted sweet potatoes, carrots, chickpeas, hard-boiled egg and ham. Some other toppings that would be good include tomato, sunflower seeds, mushrooms, edamame, etc. Also, this could easily be a vegetarian salad – simply swap out the chicken and ham for other proteins, such as lentils.
- Top with salad dressing.
See how easy that was? Enjoy!
*Disclaimer: Stemilt sent me some complimentary Skylar Rae cherries, and I loved them. I mostly just ate them, but also put them into this salad. All views are my own.
Share this:

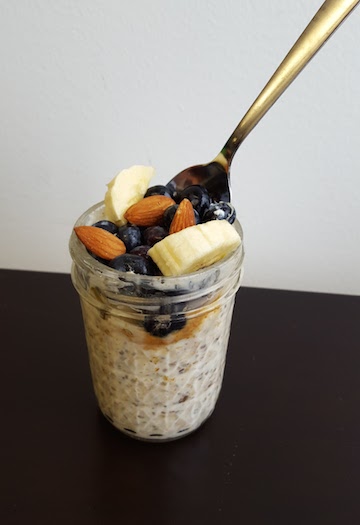
Meatless Monday: Easy (and adaptable) Overnight Oats
It has been a while since I’ve written a Meatless Monday post – and I don’t know why! I’ve had a few meatfree meals lately, but I haven’t taken the time to truly capture them and write down a recipe and then post them.
So, today’s meatless post is a meal you can enjoy for breakfast. Overnight oats! I make these sometimes when I’m craving something other than my typical egg white and spinach and veggies for breakfast and have been asked how I make them. The answer? It’s always different. There are so many ways to make them. It depends on what ingredients I have. So here you go – a standard overnight oats recipe for you to enjoy and it’s adaptable so you can add or remove the toppings as you please!

Here’s what you need:
- ½ cup old-fashioned rolled oats
- ⅓ cup yogurt (for this recipe, I used plain Greek yogurt)
- ½ cup milk (unsweetened vanilla almond milk is my favorite, but I didn’t have any on hand so I used regular milk)
- 1-2 teaspoons your favorite nut butter (I love almond, peanut and sun butter!)
- 1-2 teaspoons Chia seeds
- 1-2 teaspoons honey
- To top your oats (wait until you’re ready to eat to add these): fruit (I like 1/2 banana, blueberries, nuts and more nut butter)

basic overnight oats ingredients
Here’s what you do:
- Combine oats, yogurt, milk, nut butter, chia seeds and honey in a 10-12 ounce jar. Stir with a spoon or shake until everything is pretty combined.
- Let sit in fridge overnight or at least 7-8 hours. When ready do serve, add toppings! I love adding some freshly sliced banana, blueberries, a few nuts and even more nut butter.
- Enjoy a hearty and delicious breakfast. Or snack. Or dessert. I’m not judging!
Isn’t that easy? Some modifications I’ve enjoyed include:
- Adding more milk and less yogurt for a less tangy and less thick oatmeal.
- Adding some diced banana to the oats in the overnight version and peanut butter. Then topping with more banana and more peanut butter for a peanut butter and banana oats.
- Adding PB2 or another powdered peanut butter before mixing for a more peanut buttery flavor.
- Adding dried fruit or coconut to the top when it’s ready to serve
- Adding flax seed (1-2 teaspoons) for some extra fiber/grit/texture.
- Topping my oats with more oats (meaning: homemade granola) or a few mini chocolate chips if you’re feeling ambitious.
That’s one of the things I love about overnight oats – in addition to being super easy and not at all time consuming, the possibilities really are endless!
Some questions for you:
- Do you like overnight oats? What’s your favorite combination?
- What’s your go-to breakfast?
Disclosure: While I was not compensated for this post, some of the product (nut butter, oats) was provided to me by Swanson Health. My views and comments are solely my own and do not represent those of Swanson. AND I’ll likely be doing a giveaway so you can get some goodies too, soon 🙂
For more Meatless Monday posts, check out some of my past recipes or visit the linkup below! I’m linking up with Sarah and Confessions of a Mother Runner .
Share this:

Meatless Monday: Zoodles with Spinach Basil Pesto
I love my spiralizer. Have I told you that lately? Okay, I did just last week … But seriously, I’ve even written an ode to my spiralizer.
I love my zoodler.
It makes cooking so much fun.
I feel like a kid.
There you have it – my haiku to my spiralizer. There’s just something about it that makes cooking so much fun and reminds me of when I was a kid playing with play dough and making mystery meals … you know what I mean? Now that that’s off my chest (#awkward), here’s a quick and easy recipe that I made last week for St. Patrick’s Day- a super green, yet healthy, vegan dish for B and me. Sorry, I’m Italian and we had already had corned beef on Sunday – so for the holiday it was super green noodles.

Zoodles with Spinach Basil Pesto
Here’s what you need:
- 2 medium-to-large zucchini
- 1 large garlic clove
- a large bunch of basil – about 3/4 cup
- 1/2 cup spinach
- 1/4 cup toasted chopped or slivered almonds (toasting them brings out a nutty flavor)
- 3-5 Tablespoons extra virgin olive oil (depending on how thin you like your pesto – I like mine a little thicker so I use less olive oil)
Here’s what you do:
- Using your zoodler (okay, or spiralizer) cut your zucchini into fun noodle-like pieces. When done, I put my zoodles in a pile on the cutting board and like to cut them in 1/3s or 1/2s so the pieces aren’t so large. Set aside.
- Add garlic, basil and spinach to blender or food processor. I use my food processor and it works just fine. Mix well.
- Add in toasted almonds, continue to blend until a thick paste forms.
- Add in olive oil, one tablespoonful at a time and continue to blend until paste becomes somewhat creamy. Add in any extra salt, garlic, basil or olive oil to taste, as necessary. Mine makes about 1/3 cup pesto, which is perfect for this recipe. You could probably use a little less pesto but I like my zoodles coated!
- In a pan over medium heat, toss zoodles with pesto and heat for about 3-5 minutes or until just tossed and warm. Enjoy! Makes two healthy dinner portions.
Top with any of your favorite toppings – I like mine with parmesan cheese (not vegan), diced tomato, more fresh basil and even sometimes sautéed onions.
I’ll definitely be sharing more zoodle recipes soon – I’ve already made shrimp zoodle scampi, zoodles with homemade tomato sauce … and even used my spiralizer on sweet potatoes to make curly sweet potato fries!
Some questions for you:
- What’s the next Meatless Monday recipe you have planned? I’m joining with this MM linkup and of course checking out MeatlessMonday.com for ideas!
- Zoodler fans – what zoodle recipe should I make next? This is my second one shared in a week.
- How do you make your pesto? I typically use basil, olive oil, parmesan cheese and pignoli nuts, so this is a different version for me!
Share this:

Meatless Monday: Sweet Potato Zucchini Hash
I can’t believe it’s been so long since I posted a recent Meatless Monday blog post. I’ve been eating plenty of meatfree meals (I give up meat for Lent every year) but I guess I haven’t been blogging about them! For example, here are some photos of the meals I’ve been enjoying: (these were originally from my Instagram account – feel free to follow me there @koskim for more gratuitous food shots)

Curried lentils with sweet potato and cauliflower

breakfast for dinner! egg white omelets with potatoes, peppers, onions and avocado

veggie burger with a side of – veggies!

cabbage and papaya salad with peanuts

spaghetti squash with homemade spicy tomato sauce and tofu
Anyway, finally, I’m sharing a recipe with you so that you can eat meatless on Monday (or any day!). I LOVE making this recipe and have made it or a variation of it probably too many times in the past month to count – but it’s so simple and so delicious and healthy that you should try it too! Leftovers are great as well – I typically have four 2-cup size servings with this recipe and then have enough leftover for 2 lunches.

Sweet Potato Zucchini Hash
Serves 4
Here’s what you need:
- 2 TB olive oil, divided
- 1 onion, diced
- 2 zucchini, diced
- 2 bell peppers, finely chopped
- 1 sweet potato, diced
- 2 tsp. cumin, divided
- 2 tsp. ground paprika, divided
- 2 tsp. garlic powder, divided
- 1 tsp. cayenne pepper, divided (or more if you like it spicy! Note – if you have fresh hot pepper – like chili peppers or jalapeño, feel free to substitute with this)
- salt and pepper to taste
- Optional toppings: avocado, cilantro, hot sauce, tofu, sunny side up egg (not vegan)
Here’s what you do:
- Preheat oven to 400 and finely dice all your veggies. If you’re like me, this may take a little while.
- Place diced sweet potato on a prepared baking sheet (I spray mine with Pam or olive oil spray). Sprinkle generously with 1 tsp cumin, 1 tsp paprika, 1 tsp garlic powder and 1/2 tsp cayenne pepper. Cook in preheated oven for about 15 minutes. Check often so not to burn and toss potatoes halfway through.
- While potato is cooking, heat half of olive oil in a large pan. Sautee onion for a few minutes or until translucent. Add in remaining chopped up veggies – peppers and zucchini. Add in remaining cumin, garlic powder, paprika and cayenne pepper and cook for about 7-10 minutes or until veggies are browned and softened.
- When potatoes are done, add to pan with rest of veggies. Toss to incorporate. Finish until cooked but not mushy!
- Enjoy! I like mine topped with cilantro and tofu. Other fun toppings include avocado, hot sauce and/or a sunny side up egg. I’ve also served it over spinach for an extra nutritional boost. The one pictured (above and below) has tofu crumbles in it.

So many veggies!

Linking to my first MM linkup!
Question for you:
What meatless meal should I add to my repertoire?
Share this:

Meatless Monday: Quinoa Hummus Patties
I may have a hummus problem. The other day I realized I’d eaten hummus, as part of a meal, 4 days in a row. I know there are worse things to claim, but 4 days in a row? That’s nearly a week. Wonder if I can keep the streak going (I’ve also eaten chocolate about 40 days in a row) …
Anyway, I digress. The other night for dinner I was happy to have enough time to put together something vegetarian-friendly, flavorful and also that would serve as a side dish for B. I’d seem some recipes for hummus/quinoa tabbouleh and quinoa burgers and decided to combine both. They are somewhat crumbly but mine held together pretty well and were pretty flavorful without too many spices.
Warning – I took these pictures with my phone, per usual. They came out pretty gnarly (yes, worse than some of the other food pics I take) but the recipe was so delicious I had to post it. B asked I could make these again so I declare that a success 🙂

Here’s what you need:
- 1 c quinoa (cooked)
- ½ c hummus
- ½ c finely diced red pepper
- 3 green onions, finely chopped
- 1 clove garlic, minced
- 1 TBS flaxseed
- 1 tsp crushed red pepper flakes (optional)
- 1-2 TBS olive oil
Here’s what you do:
- Combine quinoa, hummus, red pepper, garlic and green onions in a bowl. Mix well.
- Add in flaxseed to help bind the mixture. Add in crushed red pepper flakes (optional if you like heat).
- Form mixture into four to five even sized patties and place on a well-greased plate. Store in refrigerator for 30 minutes to one hour. (I put it in the freezer for about 20 minutes) This will help the patties harden.
- Heat a pan with olive oil over medium to medium-high heat and add olive oil once heated. Carefully add patties to pan and brown each side for about 4-6 minutes. Be careful when flipping – patties are crumbly and you may need to reshape them if they start to come apart.
- Enjoy!
- Serving suggestion: I had 2 as a main meal and served with spinach, roasted red pepper, more hummus, tomato, and hot sauce. They’d also be delicious with a garlic yogurt sauce. B had his as a side dish to some chicken with Greek spices. I’ll be doubling the recipe next time!

I swear it tastes better than it looks
Some questions for you:
- Are you on any food-eating streaks?
- Are you a hummus fan? Yes! I also really love baba ghanoush, its smoky eggplant cousin.
- Do you make your own hummus? Actually, most of the time I find it easier and just as tasty to just buy it. If you find a brand you like – stick to it! The hummus from the recipe above was from a stand at the West Side Market and it was delicious.
- Favorite veggie burger recipe? Come on, I’m looking for a new one!
Share this:

The Best Peanut Butter Cookies Ever
It may sound cocky – or a little too strong – but I swear to you these are the best peanut butter cookies ever. They’re soft in the middle, crunchy on the outside, and oh so sweet. The original recipe came from my beloved Magnolia Bakery cookbook and I haven’t looked back since. The first time I made them, I shared them with a few of B’s friends and his friend Steve even commented, “These are the best peanut butter cookies ever.” And Steve himself is a good cook/baker!
 Anyway, don’t just trust me — or Steve — you should make these yourself.* The below recipe is with slight modifications, but I promise you won’t be disappointed.

Here’s what you need:
- 1 1/4 c all-purpose flour
- 3/4 tsp baking soda
- 1/2 tsp baking powder
- 1/4 teaspoon salt (I omitted this because I used salted butter)
- 1/2 c butter, room temperature
- 1 cup your favorite peanut butter (I’ve made these with creamy JIF peanut butter and with chunky natural Smuckers. In the case of the crunchy, I just cut down on the amount of peanuts I add in the end)
- 3/4 c granulated sugar + 3-4 TB sugar for rolling the dough
- 1/2 c packed light brown sugar
- 1 large egg
- 1 TBS milk (I used the only milk I had on hand- unsweetened almond coconut milk)
- 1 tsp vanilla extract
- 1 c peanut butter chips
- 3/4 c chopped peanuts (If using chunky peanut butter, you can use less nuts here, probably 1/4 c)
Here’s what you do:
- Preheat oven to 350 degrees F.
- In a medium bowl, combine flour, baking soda, baking powder, and salt.
- In a large bowl, beat butter and peanut butter together until creamy.
- Add sugars and beat until smooth. Add egg, milk and vanilla extract and mix well until fluffy.
- Add flour mixture in about 1/2 c at a time and beat thoroughly.
- Stir in peanut butter chips and peanuts.
- Refrigerate dough for 30 minutes. Drop dough by rounded teaspoonfuls into a bowl of 3-4 TBS granulated sugar.
- Place cookie balls onto cookie sheets lined with parchment paper, at least two inches apart. Using a fork, push down on dough balls and lightly indent the balls with a criss-cross pattern. Do not flatten cookies too much – you don’t want smooshed cookies!
- Bake for about 10 to 12 minutes. Cookies may seem soft and underdone but DO NOT OVERBAKE. They will bake a little more out of the oven and be PERFECT.
- Cool cookies on cookie sheets for 1 minute, then remove to a wire rack to cool completely.
Mouth watering yet? All you need is a glass of milk and you can enjoy these yourself. *Or better yet- I will MAIL YOU these cookies! That’s right – as I mentioned earlier this week, I’m participating in a blogger bake sale, to benefit Jordan’s Family Foundation. Since it’s for a good cause – what’s stopping you?

Who wouldn’t buy these for a good cause?
Some modifications:
- Use 1 c. semi-sweetened chocolate chunks instead of the peanut butter chips for a more chocolatey flavor
- Not a huge chocoholic? Use 1/2 c. peanut butter chips, 1/2 c. semi-sweetened chocolate chips for a peanut butter chocolate chip cookies
- Flatten cookies out with your hand and omit the fork crossing step. Then press halved peanuts (outer side facing up) to the top of the cookie. That’s what I did on the second photo above.

