The Best Peanut Butter Cookies Ever

It may sound cocky – or a little too strong – but I swear to you these are the best peanut butter cookies ever. They’re soft in the middle, crunchy on the outside, and oh so sweet. The original recipe came from my beloved Magnolia Bakery cookbook and I haven’t looked back since. The first time I made them, I shared them with a few of B’s friends and his friend Steve even commented, “These are the best peanut butter cookies ever.” And Steve himself is a good cook/baker!

peanut butter cookies - i crashed the webAnyway, don’t just trust me — or Steve — you should make these yourself.* The below recipe is with slight modifications, but I promise you won’t be disappointed.

peanut butter cookies - i crashed the web

Here’s what you need:

  • 1 1/4 c all-purpose flour
  • 3/4 tsp baking soda
  • 1/2 tsp baking powder
  • 1/4 teaspoon salt (I omitted this because I used salted butter)
  • 1/2 c butter, room temperature
  • 1 cup your favorite peanut butter (I’ve made these with creamy JIF peanut butter and with chunky natural Smuckers. In the case of the crunchy, I just cut down on the amount of peanuts I add in the end)
  • 3/4 c granulated sugar + 3-4 TB sugar for rolling the dough
  • 1/2 c packed light brown sugar
  • 1 large egg
  • 1 TBS milk (I used the only milk I had on hand- unsweetened almond coconut milk)
  • 1 tsp vanilla extract
  • 1 c peanut butter chips
  • 3/4 c chopped peanuts (If using chunky peanut butter, you can use less nuts here, probably 1/4 c)

Here’s what you do:

  1. Preheat oven to 350 degrees F.
  2. In a medium bowl, combine flour, baking soda, baking powder, and salt.
  3. In a large bowl, beat butter and peanut butter together until creamy.
  4. Add sugars and beat until smooth. Add egg, milk and vanilla extract and mix well until fluffy.
  5. Add flour mixture in about 1/2 c at a time and beat thoroughly.
  6. Stir in peanut butter chips and peanuts.
  7. Refrigerate dough for 30 minutes. Drop dough by rounded teaspoonfuls into a bowl of 3-4 TBS granulated sugar.
  8. Place cookie balls onto cookie sheets lined with parchment paper, at least two inches apart. Using a fork, push down on dough balls and lightly indent the balls with a criss-cross pattern. Do not flatten cookies too much – you don’t want smooshed cookies!
  9. Bake for about 10 to 12 minutes. Cookies may seem soft and underdone but DO NOT OVERBAKE. They will bake a little more out of the oven and be PERFECT.
  10. Cool cookies on cookie sheets for 1 minute, then remove to a wire rack to cool completely.

Mouth watering yet? All you need is a glass of milk and you can enjoy these yourself. *Or better yet- I will MAIL YOU these cookies! That’s right – as I mentioned earlier this week, I’m participating in a blogger bake sale, to benefit Jordan’s Family Foundation. Since it’s for a good cause – what’s stopping you?

Who wouldn't buy these for a good cause?

Who wouldn’t buy these for a good cause?

Some modifications:

  • Use 1 c. semi-sweetened chocolate chunks instead of the peanut butter chips for a more chocolatey flavor
  • Not a huge chocoholic? Use 1/2 c. peanut butter chips, 1/2 c. semi-sweetened chocolate chips for a peanut butter chocolate chip cookies
  • Flatten cookies out with your hand and omit the fork crossing step. Then press halved peanuts (outer side facing up) to the top of the cookie. That’s what I did on the second photo above.

Want Cookies In Your Mailbox? (Blogger Bake Sale)

Who doesn’t want to open their mailbox to find some delicious cookies? I know, it’s a rhetorical question because the answer is obviously NOBODY. And who doesn’t want to buy cookies for a good cause? Again – NOBODY!

Who wouldn't buy these for a good cause?

Who wouldn’t buy these for a good cause?

That’s why when I saw that one of my favorite local running bloggers was hosting a Blogger Bake Sale to benefit Jordan’s Family Foundation, I was pumped to participate. Here’s some more info about JFF, from Jess’s fundraising website:

JFF primarily provides funding for research, development and education in the field of pediatric cardiology. The organization also conducts heart healthy children’s activities such as Fitness Fits Everyone (formerly Recess ROCKS!), where kids and families come together to play while also learning about healthy living

Anyway, I hope you’ll join in and support the Blogger Bake Sale. You can bid on a ton of delicious goodies, here, including my favorite peanut butter cookie recipe. That’s right, I’m baking my favorite peanut butter cookies (B’s friend Steve called them the best peanut butter cookies ever, so I think that’s what I’m calling them when I share the recipe) and you can bid on them for a good cause.

favorite peanut butter cookies - i crashed the web

Yum. You could be enjoying these cookies yourself sometime soon 🙂 Bid on them today! 

Meatless Monday: Easy Eggplant and Squash Curry

“We haven’t had Indian food in a while,” said B the other day. He was right – we were on a stint for a while where we were having Indian food as our go-to takeout or eat-out option on a somewhat (not daily) regular basis. And it’s true, I can’t recall the last time we both went out for Indian food. OR Thai food. BUT I’ve been on a going-out-to-eat spree and didn’t really want to continue it. Between traveling for work, lack of groceries and birthday / friend / etc. meals, I’m somewhat getting tired of eating out. Just ask B – I go eat to eat 4 times in a row and I’m sick of it.

Anyway, that’s why I decided to make some semi-Indian/Thai-hybrid dinner from what we had on hand in our apartment. OK, it’s probably neither (sorry if you are an expert in either cuisine) – it’s just a vegetarian curry dish. Anyway, we go to the West Side Market nearly weekly and tend to stock up on a ton of veggies from our favorite stand – and last week I had gotten tomatoes, squash, eggplant, peppers, onions and more. Keeping this in mind, and seeing a few fun recipes online, I decided to recreate the Indian/Thai/Going Out To Eat food experience right from our apartment.

eggplant and squash curry over quinoa - i crashed the web

Eggplant and Squash Curry with Quinoa

Here’s what you need:

  • 1 butternut squash
  • 3 TBS olive oil, divided into 1TBS and 2 TBS
  • 3 TBS cumin, divided
  • Salt and freshly ground black pepper
  • 2 red bell peppers, diced and seeded
  • 1 onion (I used a red onion), sliced into bite-sized pieces
  • 1 medium eggplant, diced into bite-size pieces
  • 1 (1-inch) piece fresh ginger, peeled and thinly sliced
  •  3 cloves garlic, sliced
  • 2 TBS curry powder
  • 1 teaspon ground cardamom
  • 1 (28-ounce) can diced tomatoes in juice
  • 1 can (1 ½ cups) chickpeas
  • 1 c. quinoa, cooked according to package directions (typically with 2 c water)
  • ¼ c unsweetened coconut

Here’s what you do:

  1. Reheat oven to 425 degrees F.
  2. Peel and cut squash into bite-sized pieces, about 1 inch squares. toss with 1 TBS of olive oil and season with salt, pepper and 1 TBS cumin.
  3. Place seasoned squash on a baking sheet and roast for 25 to 30 minutes, until squash is soft and starting to brown.
  4. While squash is cooking, heat  2 TBS olive oil in a large skillet. Add chopped pepper, onion, eggplant, ginger and garlic. Add salt, pepper, curry powder, cardamom and 1 TBS cumin. Cook for 3-5 minutes, letting vegetables start to get tender.
  5. Cover the skillet and cook for 10 minutes or until eggplant is softened. Add in roasted squash, canned tomatoes in juice and chickpeas. Add another tablespoon of cumin. Cook for another 3-5 minutes.
  6. Add in cooked quinoa and unsweetened coconut and cook for another minute.
  7. Enjoy!
eggplant and squash curry - icrashedtheweb.jpg

Add in the quinoa and coconut …

eggplant and squash curry - icrashedtheweb.jpg

Enjoy!

Some notes:

  • B thought this recipe was “so so” and when I asked him what he’d change he said “maybe a little less seasoning next time.” SO please use the curry/cardamom/cumin guidelines to taste – you can always add more as it continues to cook.
  •  B also doesn’t like coconut so I only added a handful to the final dish, and mostly on the portion I was eating – feel free to add more, and even some coconut milk if you prefer coconut curry to traditional curry.
  • I have used the powdered red curry, which is spicier than the yellow curry I have. Thus I didn’t add any chili powder. If you like it spicy and you only have yellow (not-so-spicy) curry on hand, feel free to add some chili powder as well!

Some questions for you: Share your answers in the comments – mine are in italic!

  • Do you ever just literally throw everything you have on hand into a dish to see what happens? Yes, too often. In this case I was actually kinda pleased with myself – it seems pre-thought out!
  • What’s your favorite Indian food dish?  I love Chicken Tikka Masala or anything Vindaloo.
  • What’s your favorite Thai dish? Any thai soup, or pad ke mao and I love their spring rolls!
  • How often do you go out to eat? How often do you feel is “too much?” I don’t know why, but after eating 3-4 meals out in a row I start to feel sick/gross. Even if I’m eating healthy, I just prefer homemade meals!

Friday Five: My birthday week!

I’m off on a mini-birthday weekend getaway (don’t worry, I’m not going far – still staying in SNOhio right now), but before I left I wanted to give a quick birthday week update. I was traveling for work 3 days this week, meaning it was a busy, productive, and speedy week! Still, here are five things I am pretty excited about:

1. So much good food.

I’ve definitely been taking advantage of the “it’s my birthday week” excuse and eating all my favorite meals. Which include some awesome salads from Rothschild Farms, sushi from Sushi 86, Janea’s salad from Stone Oven (not pictured because I gobbled it up too fast), and the Super Salad and some steam buns from Noodlecat (not pictured because the lighting was awful).

Salad from Rothschild farms and quinoa

Salad from Rothschild farms and quinoa

<3 Sushi 86

What? That's not food? You're right. But they are the January shot of the month, which seemed very birthday appropriate.

What? That’s not food? You’re right. But they are the January shot of the month, which seemed very birthday appropriate.

What are some of your favorite meals? Apparently I like salads a lot.

2. This birthday gift!

Not to gush, but I’m pretty pumped about this birthday gift that B made (as in he went to the store, bought wood, paint, hooks, etc.) for me. I’d been creeping on something to hang my bibs/medals on on Etsy,

bda gift

3. My longest treadmill run ever!

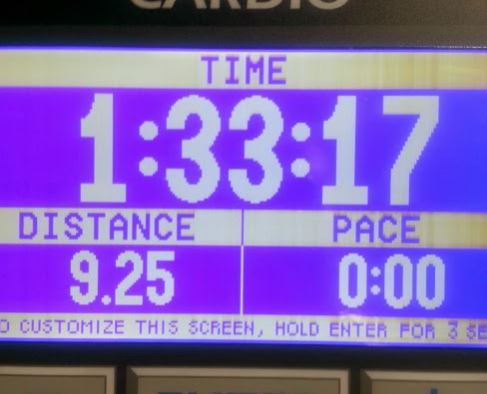
This week has been COLD. And snowy. Yes, I know it’s winter (warning, vent coming in 3….2…..1) but enough with the sub-zero temps and slippery roads! Anyway, when I woke up to “0 degrees, feels like -12, snow showers” the other morning, I knew my 9 miles probably weren’t going to happen outside before work. I told myself to just see what I could do on the treadmill, assuming I wouldn’t make it past 6-7 without stopping.

Did I go slow? Yes. Did I enjoy every minute of it? No. But did I do it? Yes. And here’s some proof:

9 mile nonstop run followed by .25 walk. DONE.

9 mile run followed by .25 walk. DONE.

4. Arctic Zero.

Okay, I know I’m late to discover this (it seems like my whole Instafeed is always pics of people enjoying their Arctic Zero), but B bought me 2 pints of it for my birthday and I am so in love with it. No, it doesn’t taste like regular ice cream, but it’s creamy/enjoyable/glorious/amazingnessinabowl nonetheless?

5. This video.

If you work in a corporate setting, you’re probably familiar with the dreaded awkward conference call. In fact, I had one this week – where I not only found myself talking on mute (and everyone else was confused), but at another point had one of those moments where we all talk at once and then have a “oh no you go ahead …” “no you go first” battle and then continue to all talk at once. Yes, those calls. If you’re familiar – enjoy this:


And of course, some questions for you:

  • What’s the longest distance you’ve run on a treadmill? How do you stay entertained?
  • Have you tried Arctic Zero? What flavors do you like?
  • Do you have a birthday coming up?
  • Homemade gifts – yay or nay?

Happy Friday and have a wonderful weekend!

Cooking with Ali – Vegetarian Samosas

I don’t know when it happened, but one day I started to really enjoy cooking. I began to see cooking as an activity, not as a means to an end, and on any given weekend (or time that I wasn’t rushed), enjoyed taking the time to cook as a way of entertainment, stress relief etc. This isn’t always the case – we all know that after a day of working late and then a late workout, cooking gets pushed to the side burner – but when I have the time I love to take the time to enjoy it and be adventurous.

My former “work spouse” (don’t ask, that’s what we called one another) Ali, also feels the same way. I am in awe of her instagram – she is always posting so many fun, creative and healthy recipes. That’s why when we got together for dinner before the holidays and she suggested we get together in January, in honor of my birthday, for a day of cooking, I couldn’t have been more excited!

Enter, cooking with Ali. First let me introduce you to Ali:

20140111_140911

Can’t you tell how awesome she is? Her apron even matches her comfy zip up. And it wasn’t intended!

Anyway, we started out with a trip to the West Side Market to pick up supplies. We knew we wanted to make something Indian-inspired, and Ali had found a recipe for some vegetarian samosas that looked amazing. I admittedly have been intimidated by rice paper for years, so I figured there was no time like the present to get over my fear.

So here you go – I present to you, Ali and my slight modification of My New Roots’ fully loaded samosas. If you make these, you MUST make the mint chutney. I admit that I wasn’t so sure (I’m not always a fan of the sweet/spicy combo) but it was AWESOME.

  VEGETARIAN SAMOSAS - I CRASHED THE WEB

Vegetarian Samosas (with slight modifications from  My New Roots’ fully loaded samosas)

Here’s what you need:

  • 8 round rice paper wrappers, about 8.5”
  • 1 Tablespoon of coconut oil
  • 1 medium onion
  • 2 cloves garlic
  • 1 tsp. minced ginger
  • ¾ tsp. sea salt
  • ½ cup unsalted cashews
  • ¼ cup unsweetened coconut
  • 3 medium carrots
  • 1 ½ cup green peas
  • 1 cup chickpeas
  • 2 cups packed fresh baby spinach
  • 2 tsp cumin
  • 1 tsp mustard powder
  • ½ tsp. turmeric
  • ¼ tsp. cardamom
  • 1/8 tsp. cinnamon
  • cayenne pepper (to taste)

Here’s what you do:

  1. In a dry skillet over medium heat, lightly toast coconut until golden. Remove from heat and set aside.
  2. Dice onion and carrots to about the size of the peas. Roughly chop up cashews.
  3. Heat the coconut oil in a frying pan. Add the onion, cumin, mustard powder and minced ginger.  Cook five minutes, then add the garlic. Cook a couple minutes, then add carrots. Stir to coat with spices, cook five minutes, add peas and chickpeas. Remove from heat and stir in spinach, coconut and cashews.
  4. Fill a large bowl about halfway with warm water. One at a time, place a rice paper wrap in the water and let soften, just until it becomes somewhat pliable (NOT soggy! – as Ali told me you should still be able to see some of the pattern from the paper on it). Remove from water and place rice paper on a clean, flat surface – like your counter. Using a pizza cutter, slice the rice paper circle in half. On both halves, place a  scoop of the filling. Fold it up! This is somewhat hard to explain and do – but the original site recommends you: “Fold the bottom corner about a third of the way up the round side of the half), followed by the top corner to meet the base of the fold you just made, creating a triangle. Fold the round edge up onto the top of the package to seal it, and flip it over. This is now the top of the samosa.”
  5. Continue and repeat steps with the remaining rice paper and filling. Place samosas on a lightly greased baking sheet.
  6. Cook for about 20 minutes, flipping about halfway through in a preheated 400°F  oven. They should be slightly brown and somewhat crispy when done. To make them even crispier, brush samosas with a little melted coconut oil before putting int he oven.
  7. Remove from oven and serve with the Sweet n’ Spicy Mint Chutney.

For the Sweet n’ Spicy Mint Chutney (DEFINITELY MAKE THIS)

Here’s what you need:

  • 1 cup firmly packed mint leaves (no stems, washed and dried)
  • 1 clove garlic
  • 1 tsp. minced ginger
  • 2 Medjool dates
  • 1 fresh serrano chili
  • ¼ cup freshly squeezed lime juice
  • 1 Tbsp. olive oil
  • salt to taste

Here’s what you do:

  1. In a food processor pulse garlic, ginger, and chili pepper until a nice paste.
  2. Add dates (you may need to remove the pits first!), mint leaves, lime juice and olive oil. Blend on high until your chutney is smooth.
  3. If it’s too chunky, add a little more olive oil.
  4. Enjoy! I dare you not to want to eat this with a spoon. Or your finger. YUM!
Some of our goodies from the West Side Market

Some of our goodies from the West Side Market. We also made stuffed portobellos.

vegetarian samosas

cooking the “meat” of the samosas. this filling was so good – i’d eat it by itself!

folding the rice paper

folding the rice paper

ready for the oven!

ready for the oven!

vegetarian samosas

ready to eat!

Three things happened after I made these:

  • I got over my fear of rice paper. Spring rolls, here I come!
  • My New Roots became one of my new favorite blogs. You must check it out. Not only because her food pictures are way better than mine, but because she has SO many good recipes I can’t wait to try – especially when I give up meat again for Lent!
  • I fell into a food coma. And was surprised that even B enjoyed these!

Oh, and this happened:

My apron clearly doesn't match

My apron clearly doesn’t match

we proceeded to take pictures of our food

we proceeded to take pictures of our food

Anyway, you MUST make these and tell me how much you love them. And how My New Roots is your new favorite blog.

Some questions for you:

  • Do you have any “work spouses”?
  • Do you wear an apron when you cook?
  • Any weird food phobias for cooking  (not eating)? Mine was rice paper, but now it may be seaweed to roll for sushi. Apparently I have a fear of things you roll?
  • Do you like cooking or find it just a necessary evil?
  • Favorite vegetarian recipes? I want them!

Edible Mittens!!! (chocolate dipped shortbread cookies)

Brrr! What a COLD week we had last week. I know it was that way in most of the country – but that thought did not warm me as I was walking to work in the single digits (“feels like -30something” with the windchill). I seriously bundled up and wasn’t ashamed – I had my mittens, scarf, hat AND furry hood. Don’t worry, I took a selfie for you.

Remind me not to take pictures of myself looking like this again.

Remind me not to take pictures of myself looking like this again.

Anyway, there’s not much you can do when the weather’s cold besides bundle up, eat a lot of soup, run on a treadmill – and of course bake! Don’t you agree? And with the weather so cold, it was only fitting to make a buttery shortbread cookie (borrowed from Ina Garden) – and shape them like mittens. Cute, don’t you think?

chocolate dipped mitten cookies - i crashed the web

Mitten Cookies! (Or Chocolate Dipped Shortbread Cookies)

Here’s what you need:

  • 3/4 pound butter, at room temperature
  • 1 cup sugar
  • 1 teaspoon vanilla extract
  • 3 1/2 cups all-purpose flour
  • 1 cup semi-sweetened chocolate chips

Here’s what you do:

  1. Preheat the oven to 350 degrees F.
  2. In a large bowl, combine butter and sugar. Mix well with an electric mixer until combined. Add in vanilla and mix well.
  3. Add in flour and mix on low speed until the dough starts to come together. Dough should be well combined and not powdery. Shape dough into a ball and chill in the refrigerator for 30 minutes.
  4. After dough is chilled, roll out the dough and cut with your cookie cutter into fun shapes. I thought I had a mitten cutter – but I didn’t. Whoops! So instead I free cut a few fun shapes (beer, a B for B, and some more) and then made a mitten stencil out of thick paper and traced that with a knife.
  5. Place the cookies on a baking sheet lined with parchment paper.
  6. Bake for 20 to 25 minutes, until the edges are light brown.
  7. Allow to cool to room temperature.

Once cool, you can melt chocolate and dip your dough shapes in them!

  1. Put about 1 c. chocolate chips in a microwave safe bowl and microwave for 30 seconds. Your chocolate won’t be melted yet (likely) but continue to stir and nuke the chocolate in 30 second intervals until it’s fully melted- this will help to ensure the chocolate doesn’t burn.
  2. Dip the cookie in the chocolate. I dipped the bottom of the mittens and then sprinkled them with sprinkles to make them the way they are. But you could also drizzle you cookies with chocolate as well.

Enjoy!

mitten shaped template

the paper mitten I drew for a template … and other cookies in the background

some cookies cooling, some cookies ready for the oven

some cookies cooling, some cookies ready for the oven

some other fun shapes I cut

some other fun shapes I cut


Refusing to succumb to Blue Monday.

Last Monday was the infamous “Blue Monday.” You know, that day in January deemed the most depressing day of the year? And why not? It’s cold, dark, everyone is sad, feeling the aftereffects of the happiness of the holidays and of course feeling the aftereffects on their credit card and waistline.

I’ll be the first to admit it – I get in a funk from about January through the end of March. Rough for someone having a January birthday. But this year, I decided that I wasn’t going to be “blue” on Blue Monday. I can’t do much about the weather, the icy roads (which make it SO hard to run outside), or the dark days, but I CAN get excited and embrace all there is to do and enjoy in Cleveland this time of year. Yes, even in the winter. How can I be blue when I’ve done all this fun stuff since the holidays have ended?

Trying out Dave and Anson’s deep fryer, eating homemade fried chicken wings and watching football:

fried chicken

Baking mitten cookies. Because when it’s cold, who doesn’t love mittens?

chocolate dipped mitten cookies

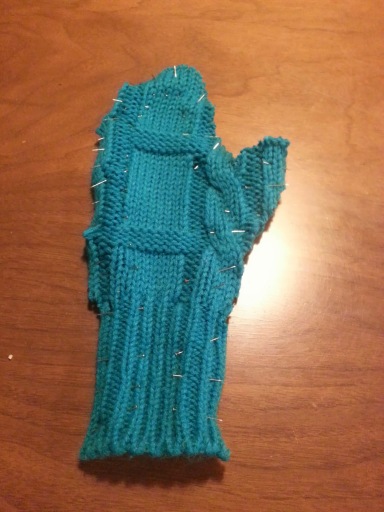
Attempting to sew mittens. I don’t have an “after” picture because the one mitten I tried to make didn’t come out. I’ll stick to baked cookie mittens (see above):

20140110_194128

Shopping at the West Side Market. Because it’s somewhat warm in there and if it’s not you can always get a hot beverage and your groceries:

my favorite stand at west side market

my favorite stand at west side market

And then cooking some fantastic vegetarian dishes with Ali. I love this girl (my former work-spouse) and don’t see her nearly enough – and it was SO good to spend a day cooking with her!

Ali making samosas

Ali making samosas

the recipe for these awesomeness is coming soon.

the recipe for these awesomeness is coming soon.

A few outdoor runs when the weather “warmed up.” And a few hot beverages from Rising Star.

almond milk latte from rising star

And seeing Chicago – with the oh so talented Peterman John O’Hurley! Thanks to B’s parents for the awesome tickets as our Christmas gift.

chicago

And then wrapping up a fabulous weekend with sushi from Sushi 86, the Golden Globes and tea and Downton Abbey.

sushi

OMG can you believe about Anna?

OMG can you believe about Anna?

And that’s just for the first few weeks of this month. What are you doing to keep yourself entertained this month?

Meatless Monday: Chickpea Ratatouille

B and I have been watching old episodes of Julia Child’s The French Chef lately. That’s what happens when you don’t have cable. The show is in black and white, done in all one take, and all in all pretty funny to watch – not only because Julia Child is a funny character (her voice sounds like a muppet to me!) but also because the kitchen appliances are SO old and also because things don’t always work out as planned. There is no “cut” and then on to the next scene – meaning if something boils over or Julia uses vermouth instead of vinegar, we see it all! Why aren’t food shows like that today? So much more real, and fun, in my opinion.

Anyway, one old episode we saw Julia make some sort of french ratatoullie. I think I zoned out during the episode, but it reminded me that I hadn’t had ratatouille in quite some time and I was overdue. So, here’s a simple and easy meatless meal you can enjoy. I served mine over a quinoa blend, and B had his with chicken.

Chickpea Ratatouille - i crashed the web

Chickpea Ratatouille (Vegetarian)

Here’s what you need:

  • 1 medium eggplant, cut into about 1-inch large chunks
  • 1 zucchini, cut into about 1-inch chunks
  • 1/2 medium red onion, chopped
  • 2 peppers (I used two red bell), sliced
  • 3 large carrots, chopped into about 1/2-1 inch slices
  • 1 tbs olive oil
  • 1 28 oz. can of diced tomatoes
  • 3 cloves garlic, chopped in half
  • 1 16 oz. can of chickpeas, drained
  • salt/pepper to taste

Here’s what you do:

  1. Preheat your oven to 425°F.
  2. Combine chopped eggplant, zucchini, onion, peppers and carrots in a large bowl. Pour olive oil over mixed vegetables and mix well.
  3. Pour veggie mixture, can of tomatoes, garlic, and salt in large roasting pan.
  4. Roast vegetables for 30 minutes, until lightly brown and softened. Check at about 15-20 minutes in and stir mixture to ensure evenly cooked veggies.
  5. At about 30 minutes in, add chickpeas to roasting pan and cook for another 10-15 minutes. Season with salt and pepper to taste and enjoy!

Makes about 4 vegetarian main courses (again, mine was served over quinoa!) or even more side dishes (B had his with some balsamic marinated chicken I made).

Vegetarian Chickpea Ratatouille - i crashed the web

I’m also thinking about giving up meat again for Lent? What do you think – should I try it again? It wasn’t easy for me, that’s for sure!

Some questions for you:

  • What’s your favorite cooking show?
  • Vegetarian main meals – yay or nay? What’s your favorite? I’m a big fan of hearty veggie burgers, either homemade or store bought if I have to (my faves are Luna burgers and Morningstar).
  • Do you try to eat meatless once a week?
  • Do you give up anything for Lent?

Rolo Stuffed Brownies with Peanut Butter Frosting (a.k.a. You Haven’t Lived Yet)

A few weeks before Christmas, my cousin posted on my Facebook wall, “So I heard your looking for cookie suggestions.. well I have a BROWNIE suggestion – fudge peanut butter caramel brownie.” Um, fudge + caramel + peanut butter? Challenge accepted!

Instead of scouring the web for what I’m sure already exists (I know there has to be a Peanut Butter Caramel Fudge Brownie Recipe out there) I decided to just make up something pretty similar. Okay I’ll admit it – this is a semi-homemade recipe. I happen to love brownie mix brownies. Yes, I have a few favorite brownies recipes (including this one), but when it comes to brownies that have frosting and other goodness, I find that I rely on good-ole brownie mix and nobody is any wiser. Add Rolos and homemade peanut butter frosting? Even better.

Looking for an easy, pretty delicious sweet recipe for your next get-together? Want to please a chocolate lover? Here you go!
rolo stuffed brownies with peanut butter frosting ~ i crashed the web

Rolo Stuffed Brownies with Peanut Butter Frosting 

Here’s what you need:

For the brownies (makes 12):

  • A box of brownie mix (see, I told you it’s easy! I used Ghirardelli Double Chocolate Brownie mix… but if you must, feel free to use your own favorite brownie recipe)
  • Ingredients required per brownie mix box (mine had oil, water and eggs)
  • 1 cup semi-sweet chocolate chips
  • 20 Rolos

For the peanut butter frosting:

  • 1/4 cup butter (room temperature)
  • 1 cup creamy peanut butter
  • 1 – 1 ½ cups powdered sugar
  • 2-3 Tbs milk (I used original almond milk, because that’s what I have on hand)
  • 2-3 Rolos, chopped up

Here’s what you do:

For the brownies:

  1. Prepare brownie batter per directions on box.
  2. Stir in semi-sweet chocolate chips.
  3. Pour batter into a 9×13 prepared pan. I lined mine with parchment paper.
  4. Unwrap the Rolos and place them evenly into batter softly, about one inch apart so that there are about one Rolo per brownie when cooked.
  5. Bake according to package directions.
  6. Cool completely before frosting.

For the frosting:

  1. Beat peanut butter and butter until well blended.
  2. Gradually add sugar, 1/4 cup or so at a time until frosting stiffens.
  3. Add milk.  Continue mixing until creamy.
  4. Frost brownies! Chop up the remaining Rolos and sprinkle on top of frosted brownies.
rolo stuffed brownies with peanut butter frosting ~ i crashed the web

enjoy!

A Mini Vacation: Philly, Asheville and Nashville!

Both B and I had some time off between Christmas and January 1, so we decided to take a quick trip during our vacation. Last year you may recall we did a few days in Montreal (and they had a HUGE snowstorm) and Toronto. This year, we spent the post-Christmas holiday traveling south to Nashville! But we made a few stops on our way there.

We started off with a way-too-quick stop in New Jersey to visit a few of my family members. I haven’t seen most of them since B and I were married – which is WAAY too long – so it was great to see them, even if just for a short while.

Just a few of my family in New Jersey

New Jersey/Staten Island cousins! (a few were camera shy)

We then stopped off and spent the night in Philly, having dinner and staying with our friends Mitch and Becca. They’re both pretty amazing and both doctors, but made time to enjoy dinner with us. They also live in the cutest townhouse on the cutest street.

20131227_080937

how cute is their street?

After that we traveled down some more and stopped off in Virginia at Monticello to see the famous presidential home. It did not disappoint – we had a beautiful day and the walk through the grounds with the mountains in the background was amazing. Oh and the home itself is really cool!

20131227_155227

#selfie

IMG_1660

After Monticello, we stopped by downtown Charlottesville to explore the nearby area. I didn’t take any pictures, sadly – but I assure you that their downtown is REALLY cool and it made B kinda wish he had gone to UVA. Except then we never would’ve met … hmmm …

We drove a little more and spent the night in Asheville, another college town. I enjoyed Asheville – we had a seriously great meal at a Farm Burger when we arrived (which thankfully was still open – we learned the hard way that most places close by 9-10 p.m. for food!) and walked around the downtown area at night. The next morning we had a quick breakfast of some pastries from a local breakfast joint (all of the recommended brunch places had 45 min + waiting times and we didn’t want to deal with that) and local coffee and picked up some local chocolates before hitting the road to our final destination – Nashville!

Walking around Asheville

Walking around Asheville

LOCAL chocolate nom nom

LOCAL chocolate nom nom

B in the coffee shop

B in the coffee shop waiting for his typical pourover

Nashville was great. B and I had been there before so there was no rush to take in all the sights or do all the sight-seeing stuff we could in just a few days. Plus, we were staying with our friend from college Eric and his fiance so it was great to catch up with them an just hang out. I can’t believe they’re getting married this year!

Anyway, our time in Nashville mostly consisted of good food, catching up, going out and enjoying the weather.

College friends!

College friends!

the ladies

the ladies

20131229_232718

We even met up with a former Clevelander, Brad, who now lives in Nashville!

We made time for a run around Belmont (which was gorgeous!) one afternoon (I even wore capris! I miss the warm weather), and a visit to the Hermitage, Andrew Jackson’s home. Yup, TWO presidential homes in ONE trip!

Our guide at the Hermitage

Our guide at the Hermitage

Yes, another presidential home. Can you tell I married a history major?

Yes, another presidential home. Can you tell I married a history major?

Oh, and a stop at the Parthenon. Yes, still in Nashville.

Parthenon! In Nashville!

Parthenon! In Nashville!

IMG_1671

And of course – we enjoyed some BBQ!

This was my meal.

This was my meal.

All in all, it was a GREAT mini-vacation, just what B and I needed before getting back to the grind … and the tremendous snow we’ve been having in Cleveland.

So I leave you with a picture of B and I, enjoying the SUNNY weather (no coats!!) in Nashville.
20131229_131313

Some questions for you, because it’s been TOO long!

  • Favorite travel snack/food? Skinny vanilla lattes and peanut m&ms.
  • Do you like your BBQ sweet or smoky? Smoky! Though Nashville’s was a combination of both – and that was yummy.
  • Taken any historical vacations?
  • How much snow do you have where you live?